728x90
반응형
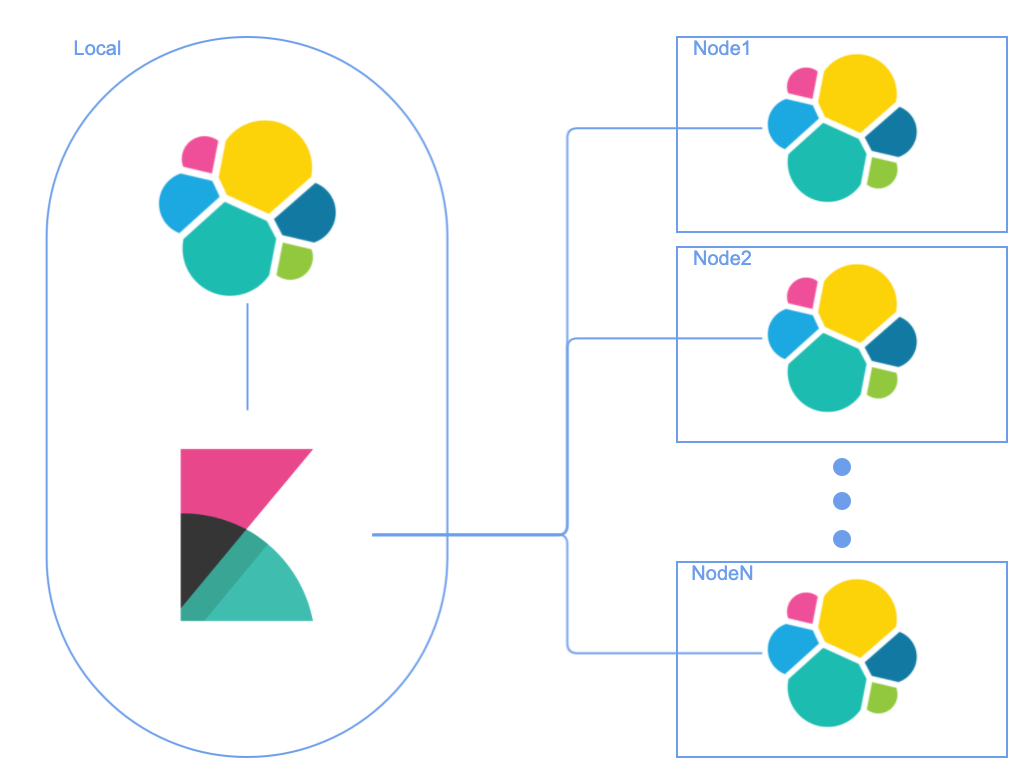
Local Kibana에서 여러 Cluster의 Elasticsearch로 접근하여 쿼리할 수 있도록 Cross Cluster Searching (CCS) 를 설정 해보려고 한다.
CCS 를 사용하기 위해서는 enable security 설정을 해야 한다.
1. enable security
elasticsearch.yml 에서 xpack 에서 security enable 설정을 true로 활성화 한다.
# elasticsearch.yml

xpack.security.enabled: true
2. Transport Layer Security 설정
remote cluster는 transport 를 사용하게 되며 TLS 설정을 진행해야 한다.
CA 생성
elasticsearch-certutil 을 사용해서 CA를 생성할 수 있으며 default file 이름은 elastic-stack-ca.p12 로 생성된다.
Production에서 사용 될 경우 password 도 설정하자.
$ ./bin/elasticsearch-certutil ca

This tool assists you in the generation of X.509 certificates and certificate
signing requests for use with SSL/TLS in the Elastic stack.

The 'ca' mode generates a new 'certificate authority'
This will create a new X.509 certificate and private key that can be used
to sign certificate when running in 'cert' mode.

Use the 'ca-dn' option if you wish to configure the 'distinguished name'
of the certificate authority

By default the 'ca' mode produces a single PKCS#12 output file which holds:
    * The CA certificate
    * The CA's private key

If you elect to generate PEM format certificates (the -pem option), then the output will
be a zip file containing individual files for the CA certificate and private key

Please enter the desired output file [elastic-stack-ca.p12]:
Enter password for elastic-stack-ca.p12 :
Certificate & Private key 생성
생성된 CA를 이용해서 certificate와 private key를 생성한다.
$ ./bin/elasticsearch-certutil cert --ca elastic-stack-ca.p12

This tool assists you in the generation of X.509 certificates and certificate
signing requests for use with SSL/TLS in the Elastic stack.

The 'cert' mode generates X.509 certificate and private keys.
    * By default, this generates a single certificate and key for use
       on a single instance.
    * The '-multiple' option will prompt you to enter details for multiple
       instances and will generate a certificate and key for each one
    * The '-in' option allows for the certificate generation to be automated by describing
       the details of each instance in a YAML file

    * An instance is any piece of the Elastic Stack that requires an SSL certificate.
      Depending on your configuration, Elasticsearch, Logstash, Kibana, and Beats
      may all require a certificate and private key.
    * The minimum required value for each instance is a name. This can simply be the
      hostname, which will be used as the Common Name of the certificate. A full
      distinguished name may also be used.
    * A filename value may be required for each instance. This is necessary when the
      name would result in an invalid file or directory name. The name provided here
      is used as the directory name (within the zip) and the prefix for the key and
      certificate files. The filename is required if you are prompted and the name
      is not displayed in the prompt.
    * IP addresses and DNS names are optional. Multiple values can be specified as a
      comma separated string. If no IP addresses or DNS names are provided, you may
      disable hostname verification in your SSL configuration.

    * All certificates generated by this tool will be signed by a certificate authority (CA).
    * The tool can automatically generate a new CA for you, or you can provide your own with the
         -ca or -ca-cert command line options.

By default the 'cert' mode produces a single PKCS#12 output file which holds:
    * The instance certificate
    * The private key for the instance certificate
    * The CA certificate

If you specify any of the following options:
    * -pem (PEM formatted output)
    * -keep-ca-key (retain generated CA key)
    * -multiple (generate multiple certificates)
    * -in (generate certificates from an input file)
then the output will be be a zip file containing individual certificate/key files

Enter password for CA (elastic-stack-ca.p12) :
Please enter the desired output file [elastic-certificates.p12]:
Enter password for elastic-certificates.p12 :

Certificates written to /usr/share/elasticsearch/elastic-certificates.p12

This file should be properly secured as it contains the private key for
your instance.

This file is a self contained file and can be copied and used 'as is'
For each Elastic product that you wish to configure, you should copy
this '.p12' file to the relevant configuration directory
and then follow the SSL configuration instructions in the product guide.

For client applications, you may only need to copy the CA certificate and
configure the client to trust this certificate.
파일 복사
생성된 elastic-certificates.p12 파일을 모든 노드의 $ES_PATH_CONF (ex. /usr/share/elasticsearch/config) 폴더로 복사 한다.
SSL / TLS 설정 추가
security 를 활성화하기 위해 설정하였던 elsaticsearch.yml에 아래와 같이 SSL / TLS 설정을 추가 해준다.
# elasticsearch.yml

xpack.security.transport.ssl.enabled: true
xpack.security.transport.ssl.verification_mode: certificate
xpack.security.transport.ssl.client_authentication: required
xpack.security.transport.ssl.keystore.path: elastic-certificates.p12
xpack.security.transport.ssl.truststore.path: elastic-certificates.p12
3. Elasticsearch 재시작
TLS / SSL 설정을 활성화 하려는 모든 노드의 Elasticsearch 를 재시작 한 이후 아래 처럼 xpack 모듈의 security 가 활성화 되었는지 확인 한다.
{"type": "server", "timestamp": "2021-11-15T08:25:04,721Z", "level": "DEBUG", "component": "o.e.a.ActionModule", "cluster.name": "elasticsearch", "node.name": "elasticsearch-master-0", "message": "Using REST wrapper from plugin org.elasticsearch.xpack.security.Security" }

{"type": "server", "timestamp": "2021-11-15T08:25:09,623Z", "level": "INFO", "component": "o.e.x.s.s.SecurityStatusChangeListener", "cluster.name": "elasticsearch", "node.name": "elasticsearch-master-0", "message": "Active license is now [BASIC]; Security is enabled", "cluster.uuid": "9ZJ4yOlQS16MjN5bNT_3Fg", "node.id": "3MBkdljIRC-k-xSRcFYHMA"  }
728x90
반응형
'Programming > Etc' 카테고리의 다른 글
| [Go] Go 설치 for Mac (0) | 2021.12.09 |
|---|---|
| [Elasticsearch] remote cluster 설정하기 - 02 (Remote Cluster 추가) (61) | 2021.11.19 |
| [OMEGA][오메가] 스피드마스터 문워치 구매 후기 (0) | 2021.11.10 |
| linux SSL 인증서 만료일 확인하기 (0) | 2021.11.10 |
| [MSA] Microservices Architecture: 마이크로서비스란 (0) | 2021.11.04 |


댓글